oooo, this one turned out mighty fine. Been playing around with patinas. This PMC tube bead turned the most amazing rainbowy colour, dominately copper with touches of blue and green. The trick is to dip into liver of sulphur for a few seconds several times, each time dipping the bead a little less into the solution so that the colours varigate. So... some parts of the bead are subjected to more patina-ing (hehehe...um, what can I tell ya? I like to make up words),... the most time in the solution, the darker it is. I definitely want to explore this some more...
Thursday, June 21, 2007
Used Makins air dry clay for a scrapbook cover. Felt like I was in primary school again! Fun! When I do this project again, I'll be sure to choose the brighter colours for the script writing down the bottom and possibly only use one colour for cutout hands near each letter A R T, it's a bit hard to read. If you click on it, you'll get a larger pic and you'll see this more clearly.
My first ever attempt at mosaic, easy when you have such great instructions (by the wonderful Lara LeReveur)! I've used Makins clay to make the tiles. I'm really beginning to like this clay now that I have a handle on how it behaves. Bakable polymer clay, air dry clay, ceramic clay, silver clay...they all have totally different properties and each needs it's own specialized treatment, each has it's own learning curve. Makins air dry clay excels in 'handle-ability' (yes, it's a word!). I much prefer using it to sculpt with than any of the bakable polymer clays. It 'tiled' up easily for this project too!
Sunday, June 17, 2007
Well, we're home! All the boxes are unpacked, the carpets ripped out, rooms painted, windows cleaned. Still so much to do but now that we're finally comfortable in a clean house...I'm claying!
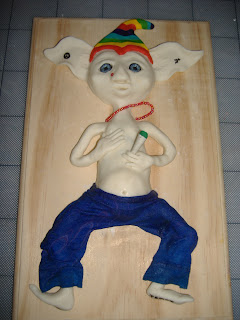
I'm new to sculpting really, only dabbled at it till now. But I need to hone my skills over the next few weeks because I'll be teaching some sculpture to clay retreat guests as part of the Contemporary Clay Instructors Program. We had to make an elf...and I'm just not an 'elf' kinda gal so mine became a hippy elf!
I must say I'm reeeeally impressed with the Makins clay I used for this project. Up till now I've been using super sculpey or modelene but this Makins clay beats those hands down. Much easier to use. No fingerprints. Ofcourse, if you're just practicing, it's a good idea to use the bake clays because they don't dry out, you can change things again and again...but once you have an idea what you're doing, this Makins clay is a breeze to sculpt with. His trousers are made from some lovely old marble dyed hippy skirt I had kept long past it's use by date because I like the fabric...add some paverpol...and it'll last forever!
Subscribe to:
Posts (Atom)